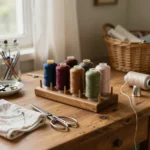
I’ve spent the last 12 years sewing everything from simple tote bags to couture garments, and I can say with certainty: if you’ve ever spent 10 minutes untangling a knotted mess of thread instead of sewing, you already know why learning how to organize thread spools is a game-changer for any sewing space.
Whether you’re a beginner with a small stash of basic polyester threads or an intermediate sewist with hundreds of spools for quilting, embroidery, and garment making, a cluttered thread collection slows you down and increases the risk of ruining expensive materials. Tangled threads snap mid-stitch, mismatched spools waste time during project setup, and dusty, sun-bleached thread can ruin the finish of even the most carefully sewn garment.
Why Proper Thread Spool Organization Matters
Saves Time During Projects
The average sewist spends 15–20 minutes per project just locating the right thread color and type, according to a 2023 survey of 500 hobby sewers. When your spools are sorted by color, weight, and fiber type, you can grab what you need in seconds, not minutes. This adds up: if you sew 2 projects per week, organized thread saves you over 30 hours of prep time per year.
Extends Thread Lifespan
Thread is made of organic or synthetic fibers that degrade when exposed to dust, moisture, and UV light. Proper storage keeps spools away from these elements, preserving their tensile strength and color vibrancy. Check if your thread has passed its prime before storing it – brittle, faded spools should be purged, not organized, to avoid breakage mid-project.
Reduces Wasted Materials
Tangled thread often gets cut short and thrown away, wasting yards of usable material. Organized spools also make it easier to track how much thread you have left, so you don’t overbuy spools you don’t need. Stick to recommended thread types for common sewing projects to build a stash that’s useful, not cluttered with low-quality spools that tangle or break easily.
Prep Work: Sort Before You Store
Never skip the sorting step – organizing unsorted thread is like putting dirty clothes away in a drawer without washing them first. You’ll end up with a messy system that doesn’t work for your needs.
Purge Expired or Damaged Thread
Start by laying all your spools out on a flat surface. Discard any spools that are: faded, brittle, or have visible mold; tangled beyond repair (if you can’t untangle it in 2 minutes, toss it); or low-quality threads that consistently snap or shed lint. For reference, most polyester threads last 5–7 years, while cotton threads last 3–5 years in proper storage.
Group Spools by Type and Weight
Next, group your remaining spools into categories that make sense for your sewing habits. Common groupings include:
- Fiber type: polyester, cotton, silk, metallic, embroidery floss
- Weight: 40wt (standard sewing), 50wt (quilting), 30wt (heavy-duty), 60wt (fine embroidery)
- Project type: garment sewing, quilting, embroidery, upholstery
- Color family: reds, blues, neutrals, pastels
Label Everything Clearly
Once grouped, label each category with waterproof, fade-resistant labels. Include key details on each label: fiber type, weight, and color name/number if available. This is especially important if you store thread in opaque containers, where you can’t see the spools inside.
7 Proven Methods for How to Organize Thread Spools
Every sewing space is different, so we’ve rounded up 7 storage methods to fit every budget, space, and sewing style. For more tips on organizing your entire sewing area, refer to expert-reviewed sewing room organization guidelines from trusted crafting authorities.
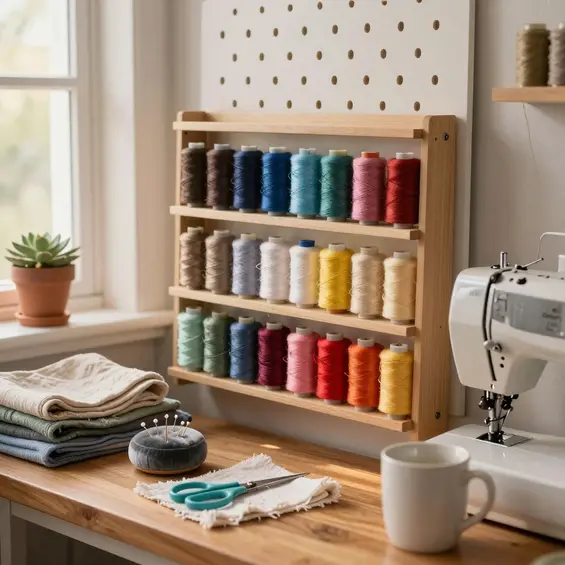
1. Wall-Mounted Thread Racks (Best for Small Spaces)
Wall-mounted racks are the most popular storage method for small sewing rooms. They hold 30–100 spools depending on size, and keep thread visible and accessible. Look for racks with tilted pegs to prevent spools from sliding off, and mount them at eye level to avoid straining your neck when selecting colors.
Pros: Saves drawer and counter space, easy to see all colors at once. Cons: Exposes thread to dust and light, so cover with a clear plastic curtain if your sewing room gets direct sunlight.
2. Drawer Inserts with Custom Cutouts (Best for Large Stashes)
If you have a dedicated sewing drawer, custom foam or acrylic inserts with round cutouts for each spool are ideal. They keep spools upright, prevent rolling, and protect thread from dust. You can buy pre-made inserts for standard drawer sizes, or cut your own from high-density foam if you have an irregularly sized drawer.
Pros: Protects thread from light and dust, fits large stashes up to 200 spools. Cons: Requires dedicated drawer space, inserts can be expensive for custom sizes.
3. Transparent Stackable Bins (Best for Visibility)
Clear plastic bins with secure lids let you see your entire thread stash at a glance, even when stacked. Sort each bin by color family or thread type, and add a label to the front of each bin. Look for bins with snap-tight lids to keep out dust and moisture, and avoid thin, flimsy plastic that can crack under weight.
Pros: Stackable for small spaces, visible contents, affordable. Cons: Can get heavy when full, not ideal for very large spools (over 500 yards).
4. Hanging Shoe Organizers (Budget-Friendly Option)
Over-the-door shoe organizers are a cheap, effective storage solution for thread spools. Each pocket holds 3–5 spools depending on size, and the clear plastic pockets let you see colors easily. Hang the organizer on the back of your sewing room door or inside a closet to save space.
Pros: Under $20, uses unused door space, portable. Cons: Pockets can tear if overstuffed, exposes thread to dust.
5. Spool Mats for Flat Storage (Best for Travel)
Spool mats are flat, rectangular pads with elastic bands or slots to hold spools flat. They’re perfect for sewists who take classes or sew on the go, as they prevent spools from rolling around in a bag. You can also use them to store thread in shallow drawers or on shelves where vertical space is limited.
Pros: Portable, prevents rolling, fits in tight spaces. Cons: Limited capacity (10–20 spools per mat), not ideal for large stashes.
6. Color-Coded Bins (Best for Visual Searchers)
If you pick thread by color first, color-coded bins are a game-changer. Buy bins in 6–8 base colors (red, blue, yellow, green, neutral, etc.), and store matching thread spools in each bin. Label each bin with the color name, and add smaller dividers inside to separate different thread weights within the same color family.
Pros: Fast color selection, fun to organize, works for all stash sizes. Cons: Requires multiple bins, not ideal if you sort by thread type first.
7. Magnetic Spool Holders (Best for Metal Surfaces)
If your sewing table or cabinet has metal surfaces, magnetic spool holders are a sleek, space-saving option. They stick directly to metal, hold 1–2 spools each, and let you move spools around easily as your stash changes. Look for holders with strong magnets that won’t slide down vertical surfaces.
Pros: No installation required, adjustable layout, modern look. Cons: Only works on metal surfaces, limited capacity per holder.
Common Thread Storage Mistakes to Avoid
Even with the best storage system, small mistakes can ruin your thread or make your organization system ineffective. Here are the most common errors to watch out for:
Storing Thread in Direct Sunlight
UV rays break down thread fibers and fade colors within weeks. Never store thread on a windowsill or in a room that gets direct afternoon sun. If you use wall-mounted racks, install them on a wall opposite windows, or cover them with a UV-resistant curtain.
Overstuffing Containers
Cramming too many spools into a bin or drawer causes tangles, crushes thread fibers, and makes it impossible to find what you need. Leave 1–2 inches of space at the top of every container to keep spools accessible.
Mixing Thread Types Without Labels
Metallic thread tangles easily, embroidery thread is finer than sewing thread, and upholstery thread is too thick for standard machines. Mixing these without labels leads to broken needles, snapped threads, and ruined projects. Always label containers clearly, even if you think you’ll remember what’s inside.
Frequently Asked Questions About Thread Spool Organization
How many thread spools should a beginner keep?
Beginners only need 10–15 spools to start: basic neutrals (black, white, beige, gray), primary colors, and 2–3 spools of thread matched to your most common fabric types (e.g., polyester for knit fabrics, cotton for quilting cotton). Add to your stash slowly as you complete projects, to avoid overbuying.
Can I store thread spools in the original plastic packaging?
Yes, but only if the packaging is intact and breathable. Avoid packaging that’s torn, as it won’t protect thread from dust. Remove spools from cardboard packaging, as cardboard absorbs moisture and can lead to mold growth on thread over time.
How often should I reorganize my thread stash?
Do a quick tidy every 3 months: check for tangled spools, purge expired thread, and restock labels if they’ve faded. Do a full reorganization once a year, where you resort all spools, deep clean your storage containers, and donate any thread you haven’t used in 12 months.
Are thread spool organizers worth the cost?
Yes, if you sew regularly. A $30 wall-mounted rack pays for itself in saved time and reduced thread waste within 6 months. For budget options, repurpose household items like mason jars or shoe organizers instead of buying expensive custom systems.
Conclusion
Learning how to organize thread spools doesn’t have to be complicated or expensive. Start with a quick purge of old thread, sort your remaining spools by categories that fit your sewing style, and pick a storage method that works for your space and budget. Even small changes, like moving spools to a wall-mounted rack or labeling your bins, will save you time and frustration every time you sit down to sew.
Remember: your thread storage system should work for you, not the other way around. Adjust your system as your stash grows, and don’t be afraid to switch methods if your first choice doesn’t fit your needs. With a little effort upfront, you’ll have a tidy, accessible thread stash that makes every sewing project easier and more enjoyable.