Separate embroidery thread to reduce tangling, improve stitch definition, and achieve smoother, more precise results. Most embroidery floss contains six strands; separating them allows you to adjust thread thickness for different textures and designs. This technique ensures cleaner lines and professional-quality embroidery.
Understanding Embroidery Floss
Embroidery thread comes in a remarkable variety of materials, each designed for specific purposes and effects in your needlework projects. Understanding these differences helps you make informed choices for your embroidery work.
Types of embroidery thread
The embroidery world offers numerous thread types, each with unique characteristics. Cotton embroidery floss remains the most popular choice for hand embroidery due to its versatility, affordability, and wide color range. Other common options include rayon threads, which provide a silky sheen; polyester threads known for durability; silk threads with their luxurious appearance; and metallic threads that add sparkle to designs.
Pearl cotton (also called perle) differs from standard embroidery floss as it’s non-divisible with a lustrous sheen and twisted appearance. Specialty threads like floche, coton a broder, Danish flower thread, and Mountmellick each serve particular embroidery styles and techniques.
What makes stranded floss different
The defining characteristic of stranded embroidery floss is its divisibility. Standard embroidery floss, often called six-stranded embroidery thread, consists of six individual strands twisted together. Major manufacturers like DMC, Anchor, Cosmo, and others produce these threads with slight variations in quality and texture.
A typical skein of DMC embroidery floss contains 8 meters (8.7 yards) of thread. This structure makes stranded floss exceptionally versatile – you can use all six strands together for bold effects or separate them for finer work. The terms “strands,” “plies,” and “threads” are sometimes used interchangeably to describe these individual fibers.
Why separation is necessary
Separating embroidery floss isn’t just a suggestion – it’s a fundamental technique that dramatically improves your work. Furthermore, any type of divisible thread benefits from this process.
The primary reason for separating floss is that it untwists the individual strands from each other. Consequently, when you recombine them, they lie next to each other rather than twisting around each other. This creates fuller and more consistent stitch coverage in your embroidery.
Additionally, working with separated threads prevents frustrating tangles and knots that often occur when using twisted strands. Depending on your project, you might use anywhere from one to six strands – cross-stitch typically uses two strands, while needle painting works best with a single strand.
How to Separate Embroidery Thread Step-by-Step
Mastering the art of separating embroidery thread takes practice, but the process itself is straightforward once you know the proper technique. Let me walk you through the step-by-step process that will help prevent those frustrating tangles and knots.
1. Cut the right length of thread
The first step is cutting your floss to a manageable length. For beginners, I recommend starting with a 12-inch (30cm) piece of thread, which provides enough length to work with without excessive tangling. As your skills improve, you can gradually increase to 18-24 inches (45-60cm). Experienced stitchers often prefer working with lengths up to 40 inches, but this takes practice to manage effectively.
Remember that longer isn’t always better—threads that are too long tend to tangle more easily and become worn before you finish using them.
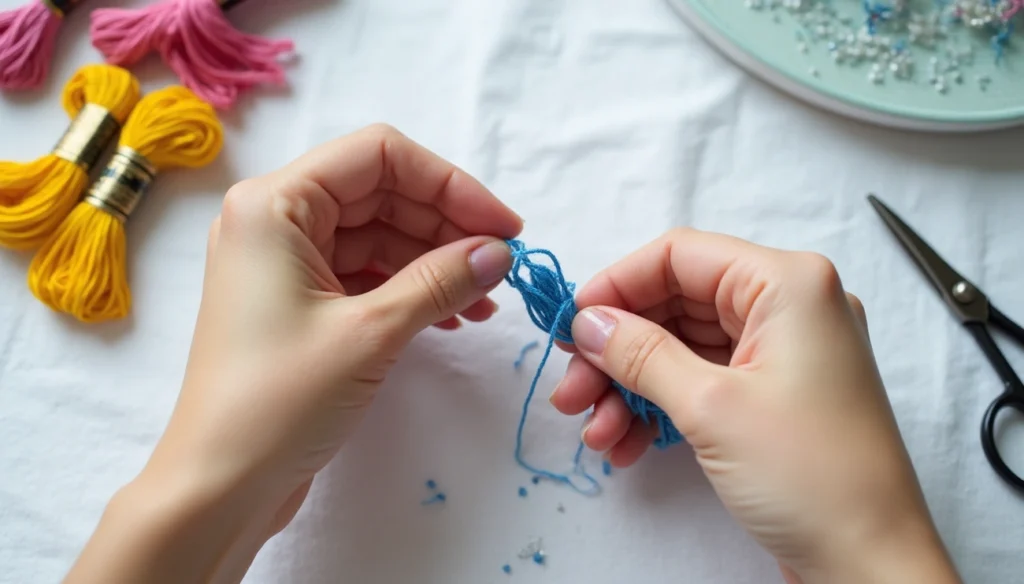
2. Identify and isolate one strand
Hold one end of your cut length between your thumb and finger, leaving a small “head” protruding above your grip. Gently tap this end to help separate the individual strands from each other. Look closely at the end of the thread and use your fingernail to isolate a single strand from the bundle.
3. Pull strands one at a time
This is the most crucial step in separating embroidery floss. While holding the bundle firmly near one end, pull the isolated strand straight up and away from the others. As you pull, you’ll notice the remaining threads bunching up—this is normal and not cause for alarm. Continue pulling slowly until the entire strand separates completely. The bunch will naturally fall out once separation is complete.
Never pull multiple strands simultaneously, even if your project requires several strands. Doing so usually results in tangles and knots.
4. Recombine the strands if needed
After separating the required number of strands, lay them parallel to each other on a flat surface. Pinch the ends together and run your fingers along the entire length to smooth them out. This “fluffing” process ensures the strands lie next to each other rather than twisting around each other, creating fuller stitches with better coverage.
For variegated threads, align them carefully so the same colors match at both ends before recombining.
Let your threaded needle dangle occasionally during stitching to prevent twisting, allowing the thread to naturally unwind itself.
Common Mistakes and How to Avoid Them
Every embroidery beginner faces certain challenges when separating floss. Throughout my years of teaching embroidery workshops, I’ve noticed these recurring issues that can turn a relaxing hobby into a frustrating experience. Fortunately, these problems are easy to fix once you know what to look for.
Pulling multiple strands at once
One of the biggest mistakes is attempting to pull multiple strands simultaneously. Indeed, it’s tempting to save time by pulling out two or three strands together, particularly when your project requires multiple strands. However, this almost always results in a tangled, knotted mess.
Instead, take the end of your thread bundle, hold it firmly with one hand, then isolate and pull just one strand at a time. Although the remaining threads might bunch up temporarily, they’ll smooth out naturally once the single strand is fully removed. This careful approach prevents those frustrating knots that waste both thread and patience.
Using thread that’s too long
Many beginners cut extremely long pieces of thread, assuming this saves time. Nonetheless, the opposite is true. Threads that are too long (requiring you to raise your arm above your head when pulling stitches) create multiple problems:
- Increased tangling and knotting
- Visible thread wear and fraying
- Loss of thread sheen and color consistency
- Physical strain from awkward arm positions
The ideal length for embroidery thread is approximately 12-20 inches (30-50cm). This length provides enough thread to work with efficiently without excessive wear or tangling. For specialty stitches like woven roses, you can double this length since the thread passes through the fabric less frequently.
Not smoothing threads before stitching
After separating your strands, smoothing them before threading your needle is essential. Without this step, your recombined strands remain twisted around each other rather than lying parallel. Subsequently, this affects how your stitches lie on the fabric.
To smooth your threads properly, simply run your fingers along the separated strands before recombining them. Furthermore, letting your threaded needle dangle occasionally while stitching allows the thread to untwist naturally, maintaining that smooth, parallel arrangement that creates fuller, more consistent stitches.
Tips for Better Stitching After Separation
Once you’ve mastered separating your embroidery thread, several techniques will help maintain those perfectly separated strands throughout your stitching process. These small adjustments make a significant difference in the quality of your finished work.
Letting thread dangle to prevent twisting
After every few stitches, pause and let your needle and thread hang freely toward the floor. This simple practice allows the thread to naturally untwist itself. As you stitch, the thread inevitably twists up, causing strands to catch on each other and create knots. Moreover, this twisting reduces the fullness and consistency of your stitches.
The dangling method works because gravity pulls on the thread, causing it to spin in the opposite direction from how it was twisted during stitching. First, hold your fabric so the needle hangs downward, then wait a few moments as the thread spins and untwists itself naturally.
Using a starter knot
The right knot can make a substantial difference when beginning your embroidery work. Instead of traditional knots (which create unsightly lumps), consider these alternatives:
The loop method works beautifully when using an even number of strands. Fold your thread in half, thread the folded end through the needle, then pull the needle through your fabric leaving a loop on the back. Next, pass your needle through this loop to secure the thread.
For projects requiring odd numbers of strands, temporary waste knots work well. Position the knot away from your stitching area, then secure it by working over the thread on the back side as you stitch.
Smoothing strands before threading the needle
After separating embroidery floss, gently stroke the strands with your fingers before recombining them. This “petting” motion helps straighten the thread and decrease the waviness that develops from being stored in skeins.
For easier needle threading, cut the thread at a 45-degree angle with sharp scissors. Likewise, avoid separating extremely long threads, as shorter lengths (12-20 inches) are less prone to tangling yet still provide efficient stitching length.
Conclusion
Mastering the art of separating embroidery thread transforms your stitching from basic to beautiful. Throughout this guide, we’ve explored why this seemingly small technique makes such a significant difference in your finished work.
Separating your embroidery floss properly prevents frustrating tangles while creating fuller, more consistent stitches. Additionally, understanding the various thread types helps you make informed choices for different projects. The six-strand structure of standard embroidery floss offers remarkable versatility—you can use anywhere from one to all six strands depending on your desired effect.
Remember those key steps: cut manageable lengths, isolate one strand at a time, pull gently, and smooth before stitching. Most importantly, never pull multiple strands simultaneously, no matter how tempting it might seem!