Creating a reversible bucket hat is a fun way to showcase your style while staying sun-safe. Start by selecting lightweight fabrics like cotton or canvas for comfort and breathability. Measure your head accurately, cut your fabric pieces precisely, and assemble the hat with flair. Don’t forget to add a sweatband for extra comfort! With endless personalization options, your hat will be uniquely yours. Curious about more tips and tricks to elevate your design?
Materials Needed for Your Bucket Hat
To create your stylish reversible bucket hat, you’ll need just a handful of essential materials. Start with your fabric choices—opt for lightweight cotton or denim for breathability and style. You’ll want two contrasting fabrics to maximize that reversible flair.
Next, grab some interfacing to give your hat a structured finish, and don’t forget a sewing machine and basic sewing supplies like scissors and thread. Before you start cutting, measure your head accurately; this guarantees a snug fit.
You’ll need the circumference and height for the perfect bucket shape. Finally, a good iron is crucial to press those seams flat. With these materials in hand, you’re all set to craft a trendy accessory that’ll elevate any outfit!
Choosing the Right Fabric
When it comes to choosing the right fabric for your reversible bucket hat, you’ll want to contemplate not just the type, but also the weight and durability. Lightweight cottons are perfect for summer vibes, while sturdier materials can offer that chic, structured look. Don’t forget to play with prints and colors—after all, your hat should be as bold and unique as you are!
Fabric Types Overview
Selecting the perfect fabric for your reversible bucket hat can transform it from a simple accessory to a standout piece. Consider cotton canvas for its versatility and breathability—ideal for sunny days and casual outings. Its natural texture adds a touch of charm, making it a go-to choice for those who love a classic vibe.
On the other hand, waterproof nylon is your best bet for adventure seekers. It’s not only durable but also protects against unexpected showers, ensuring you stay stylish and dry. By mixing these fabrics, you can create a hat that’s both functional and fashionable, allowing you to showcase your personal style while being prepared for whatever the day brings. Choose wisely, and let your creativity shine!
Weight and Durability
Choosing the right weight and durability for your reversible bucket hat is essential for both comfort and longevity. When considering weight, think about the climate you’ll wear it in. Lightweight fabrics like cotton or linen are perfect for summer, while heavier options like canvas offer warmth for cooler days.
Durability factors come into play when selecting fabric that can withstand wear and tear. Look for blends that resist fading and fraying, ensuring your hat remains stylish over time. Water-resistant materials can also enhance longevity, especially for outdoor adventures. Balancing weight considerations with durability factors will not only elevate your hat’s style but also make it a staple in your wardrobe for years to come.
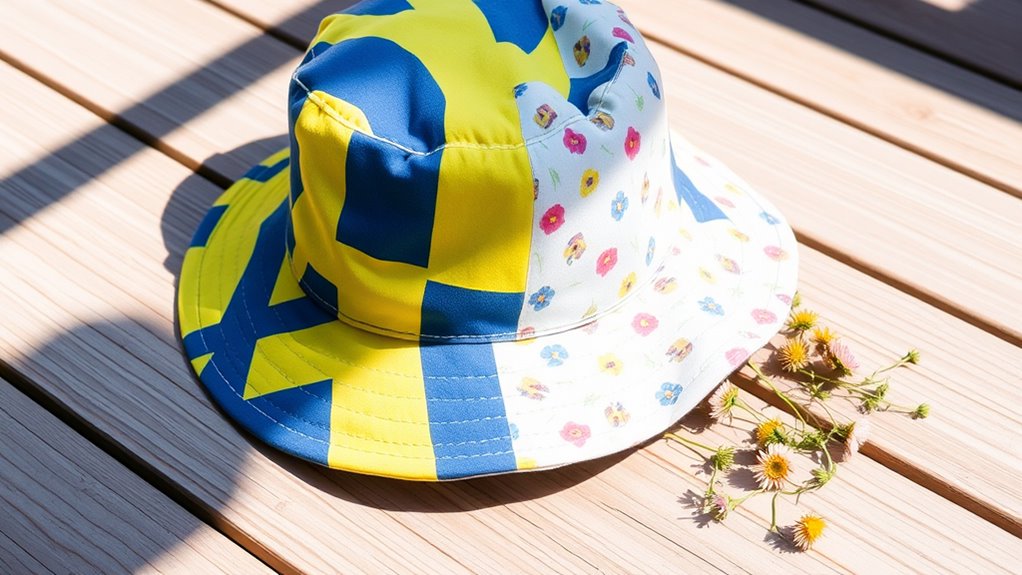
Print and Color Selection
Diving into print and color selection for your reversible bucket hat can truly elevate your style game. Start by exploring vibrant color combinations that speak to your personality. Think bold contrasts, like a rich navy paired with a sunny yellow, or softer pastels for a more subtle look.
Don’t shy away from mixing print patterns—florals on one side and stripes on the other can create a playful yet sophisticated vibe. Consider the season, too; tropical prints scream summer, while earthy tones and plaids can warm up your autumn wardrobe.
Ultimately, choose fabrics that not only resonate with you but also complement each other beautifully. Your hat’s versatility will enhance your outfits, making it a staple accessory.
Measuring Your Head Size
Ready to rock that reversible bucket hat? First, grab a soft measuring tape, because getting your head size just right is key to that perfect fit. Let’s walk through the simple steps to measure, ensuring you’ll be turning heads with your stylish creation!
Tools Needed for Measurement
Before you plunge into crafting your reversible bucket hat, it’s vital to get the right measurements for a perfect fit. You’ll need a few key tools to guarantee accuracy and style.
First, grab a flexible measuring tape; it’s your best friend for determining your head size. Wrap it gently around your head, just above your ears, for the most precise measurement. Next, have your fabric scissors handy for when you’re ready to cut your fabric.
A clean cut makes all the difference in achieving that polished look. Remember, combining precise measurements with trendy fabric will elevate your bucket hat game. So, gather your tools and get ready to create a fashionable accessory that’s just right for you!
Step-by-Step Measuring Guide
Now that you have your measuring tools at the ready, it’s time to get accurate measurements for your head size. Start by grabbing a flexible measuring tape; this’ll give you the best results. Wrap the tape around the widest part of your head, just above your ears and eyebrows.
Make certain it’s snug, but not too tight—you want measuring accuracy for that perfect fit! Take note of your head circumference in inches or centimeters. If you’re between sizes, consider going up for comfort.
Remember, a well-fitted bucket hat not only elevates your style but also guarantees you stay cool. With these precise measurements, you’re one step closer to rocking your reversible bucket hat!
Cutting Your Fabric Pieces
Although you might be enthusiastic to plunge into sewing your reversible bucket hat, taking the time to accurately cut your fabric pieces is vital for a polished finish. Start by laying out your chosen fabrics in a way that maximizes their aesthetic appeal and minimizes waste—this is your fabric layout.
Use sharp scissors or a rotary cutter for clean edges and consider employing cutting techniques like pinning or weights to keep everything in place. Don’t forget to double-check that your pattern pieces are aligned with the grainline; this guarantees your hat has the right drape and structure. With precision cutting, you’ll set the stage for a stylish, trendy accessory that’s perfect for any outing!
Assembling the Hat
With your fabric pieces meticulously cut, it’s time to bring your reversible bucket hat to life. Start by aligning your main fabric and lining, right sides together. Use your favorite hat assembly techniques to guarantee a seamless finish.
| Steps | Details |
|---|---|
| Pinning | Secure the edges with pins |
| Stitching Methods | Choose between straight or zigzag |
| Turning the Hat | Pull through the opening gently |
Stitch along the edges, leaving an opening to turn it inside out. This is where your choice of stitching methods can shine, guaranteeing durability and style. Finally, smooth out the seams and get ready for the brim—your chic accessory is almost complete!
Sewing the Brim
Choosing the right fabric for your brim can really elevate your bucket hat’s style, so consider lightweight cottons or fun prints that pop. Whether you prefer a wide, floppy look or a more structured, sporty vibe, the shape of your brim plays an essential role in the overall design. Once you’ve decided, mastering the technique to attach your brim seamlessly will guarantee your hat not only looks great but feels comfortable too!
Choosing Fabric Types
When it comes to sewing the brim of your reversible bucket hat, selecting the right fabric can make all the difference in both style and functionality.
Consider using lightweight cotton or linen for a breathable summer look, perfect for those sunny days. You might also explore fun fabric patterns like florals or stripes that reflect your personality and current trends. For fall or winter, heavier fabrics like canvas or corduroy add warmth and durability.
Don’t forget to play with seasonal fabrics that shift well—think cozy flannels for chilly months versus vibrant prints for summer. By choosing the right combination, you’ll not only enhance your hat’s appeal but also guarantee it’s practical for various weather conditions. Happy sewing!
Brim Shape Options
After you’ve picked the perfect fabrics, it’s time to decide on the brim shape that’ll define your bucket hat’s style. A curved brim adds a playful touch, gently framing your face and providing a soft silhouette.
If you’re aiming for a more edgy look, consider a flat brim; it’s a trendy choice that exudes confidence and modern flair. Want something laid-back? A floppy brim offers a relaxed vibe, perfect for breezy days at the beach.
For a structured appearance, go for a stiff brim—it’ll keep its shape and provide excellent sun protection. Each option presents unique styling potential, so visualize how each brim shape complements your chosen fabrics and overall aesthetic before making your final decision.
Attaching Brim Techniques
While you might be enthusiastic to plunge into sewing your reversible bucket hat, attaching the brim requires a bit of finesse to guarantee it looks polished and professional. Start by carefully aligning your brim attachment with the main hat body, ensuring it’s even all around. Pinning it securely helps avoid any shifting during sewing. For that extra flair, consider using decorative stitching; it not only reinforces the seam but adds a stylish touch.
- Choose contrasting thread for a bold statement.
- Experiment with different stitch patterns for uniqueness.
- Press the brim after sewing to achieve a crisp finish.
Adding a Sweatband
Sometimes, a little extra comfort can make all the difference in your reversible bucket hat. Adding a sweatband not only enhances comfort but also elevates your hat’s style.
You can choose from various sweatband materials like soft cotton, moisture-wicking polyester, or even luxurious bamboo fabric for a chic touch. Each material offers unique benefits, from breathability to quick-drying properties.
As for sweatband styles, consider a classic solid band for a timeless look or a bold patterned option to make a statement. Whichever route you take, make sure the sweatband fits snugly inside the hat for peak support. This small addition can transform your hat into a cozy, fashionable accessory that’s perfect for sunny days or outdoor adventures!
Reversible Features Explained
When you think about versatility in fashion, a reversible bucket hat immediately comes to mind. This chic accessory boasts a reversible design, allowing you to switch up your style with ease. Whether you’re heading to the beach or running errands, it provides functional versatility that fits any occasion.
- Two looks in one: Flip it inside out for a fresh vibe.
- Seasonal adaptability: Pair it with various outfits, from summer dresses to fall jackets.
- Compact storage: Easily fold it away in your bag without losing its shape.
With a reversible bucket hat, you’re not just making a fashion statement; you’re embracing practicality while keeping your look effortlessly on-trend.
Personalizing Your Hat
Personalizing your reversible bucket hat can elevate your style to a whole new level. Start by exploring various embroidery options that let you showcase your personality. From bold monograms to intricate designs, the choice is yours! You can also add fabric patches, which are a fun way to express your interests or favorite themes.
Consider sewing on patches that reflect your hobbies, favorite bands, or even travel souvenirs. Mixing and matching different colors and textures can create a unique look that stands out. Don’t forget to coordinate your hat with your outfit for an effortless vibe! With a little creativity, your bucket hat can become a true reflection of who you are, making a statement wherever you go.
Caring for Your Bucket Hat
Caring for your bucket hat is essential if you want it to last and maintain its stylish appeal. To keep it looking fresh and fabulous, consider these cleaning methods and storage tips:
- Spot Clean: Use a damp cloth with mild soap for stains; this keeps your hat looking pristine without a full wash.
- Air Dry: After cleaning, let your hat air dry away from direct sunlight to prevent fading and distortion.
- Proper Storage: Store your hat in a cool, dry place, ideally in a hat box or on a shelf, to maintain its shape and prevent crushing.
Frequently Asked Questions
Can Beginners Successfully Make a Reversible Bucket Hat?
Absolutely, you can! Beginner sewing is perfect for tackling hat patterns, especially a reversible bucket hat. With clear instructions and a little creativity, you’ll be rocking your stylish creation in no time.
What Are the Best Fabrics for Summer and Winter Hats?
For summer hats, lightweight cotton and linen fabrics dance with the breeze, while cozy wool and fleece embrace winter’s chill. Choosing seasonal materials enhances comfort, keeping you stylish through the sun’s rays and snowy days.
How Do I Fix Mistakes While Sewing My Hat?
When you make a mistake, don’t panic! Use seam rippers for precise corrections, and consider hand-stitching for delicate areas. Mastering these sewing techniques enhances your skills, ensuring your hat turns out perfectly stylish every time.
Can I Add a Chin Strap to My Bucket Hat?
Absolutely, you can add a chin strap to your bucket hat! Consider materials like cotton or nylon for durability, and make it adjustable for a custom fit. It’ll not only look trendy but keep your hat secure!
How Do I Store My Reversible Bucket Hat Properly?
To store your reversible bucket hat properly, use breathable storage solutions like cotton bags. Keep it away from direct sunlight, and maintain its shape by placing it upside down or using a hat rack.