

Caydo Electric Knitting Machine M1 Pro
Check PriceBefore you even turn a crank, spend a few minutes familiarizing yourself with your machine’s anatomy. Most circular machines like the Sentro or Addi have a yarn guide, a tension dial, and a needle bed that rotates smoothly. Place the machine on a sturdy, clean table where it won’t slip, and keep your yarn, scissors, and a crochet hook within arm’s reach.
Next, verify that your yarn weight matches the machine’s needle gauge. Standard 48 needle machines work best with DK or light worsted weight yarns, while fine gauge machines require fingering or sport weight. Using a yarn that’s too thick can jam the needles, and a yarn that’s too thin will produce loose, messy fabric.
Finally, read the manual cover to cover, even if you’ve used a knitting machine before. Each model has unique threading paths and needle arrangements that affect tension and stitch quality. A quick review of the instructions will save you hours of frustration later when you’re learning how to use a knitting machine efficiently.
Understanding Machine Parts and Accessories

SENTRO 40 Needles Circular Knitting Machine
Check PriceEvery knitting machine has three core sections: the needle bed, the carriage or crank mechanism, and the tension assembly. The needle bed holds the latch needles, which are the primary tools that form each stitch. When you turn the handle or engage the motor, rotating gears move the needles up and down in a precise sequence.
The tension unit, often a mast and disc system, controls how much yarn feeds into the machine with each revolution. Getting the tension right is the single most important factor for even stitches. Most machines include accessories like hem weights, stitch markers, and a row counter that clicks once every full rotation.
Keep these small components organized in a container; losing a weight or a needle can stall an entire project. Many experienced users also invest in a separate yarn winder to create smooth, even cakes that feed without snagging. For a deeper look at selecting the right machine for your needs, check out our guide to the best knitting machines for beginners.
Setting Up Your Knitting Machine for First Use

Sentro 48 Needle Knitting Machine with Row Counter
Check PriceBegin by clamping the machine securely to a table edge using the built in bracket. The machine must be completely stable, any wobble will cause dropped stitches and uneven rows. After clamping, check that all needles are in the forward working position and that none are bent or stuck.
Thread the yarn through the tension mast according to the diagram on your machine. The yarn should pass through one or two tension discs, then through the guide eyelet, and finally into the feeder slot directly above the needle bed. Leave a tail of about six inches hanging below the first needle so you can anchor the cast on.
Before casting on any stitches, turn the crank a few slow rotations without yarn to ensure the gears engage properly. You should hear a rhythmic clicking and see the needles rise and fall without catching. If the mechanism feels stiff, apply a single drop of sewing machine oil to the tracks as recommended by the manufacturer.
Casting On, The Foundation of Every Project

PKHOUHYI Sentro 48 Knitting Machine
Check PriceCasting on is the first real moment you’ll learn how to use a knitting machine to create fabric. Position the first needle at the starting point, usually marked with a colored indicator. Hold the yarn tail below the needle and gently guide the strand into the open latch of the needle as you begin cranking slowly forward.
The machine will automatically form the first row of loops around the needles, but you must help the process along by applying light, consistent tension on the yarn tail for the first few stitches. Once you’ve completed one full revolution, stop and use a claw weight to pull the emerging tube downward. The weight is critical, it keeps the stitches anchored and prevents them from riding up.
Many beginners panic when the first row looks like a tangled mess. Resist the urge to start over immediately. Work three or four rows slowly, and the fabric will begin to stabilize. Only then can you assess whether the cast on was successful or needs to be redone entirely from a clean slate.
Basic Knitting Techniques and Stitches

addi Express Kingsize Knitting Machine
Check PriceStockinette stitch is what your machine produces by default when you keep all needles engaged and crank in the same direction. This creates a smooth right side and a bumpy reverse side, similar to hand knitting. For a garter stitch effect, you can manually latch up the stitches with a tool after a few rounds, but that requires more effort.
Ribbing is achieved by selectively bringing some needles to the non working position while leaving others active. For example, a simple 1×1 rib uses every other needle. Cast on with a waste yarn first, switch to your project yarn, and then crank slowly while watching the needles that are in action.
To create a flat panel instead of a tube, set the machine to the flat knitting mode if available, or use the panel technique by working back and forth over a set number of needles. This requires you to reverse direction at the end of each row, which can be tricky to master. Patience and practice are essential here to maintain an even edge.
How to Create a Simple Tube or Panel

Cyandream SENTRO Knitting Machine 40 Needles
Check PriceAfter you’ve cast on successfully, continue cranking at a steady, moderate speed for a seamless tube. Keep one hand lightly on the yarn above the tension mast to sense any sudden resistance. A tube is the easiest project and perfect for hats, cowls, and sleeves because there’s no seaming required.
To convert the tube into a flat panel, you’ll need to use a technique called the ‘back and forth’ method. On circular machines without a flat bed setting, this means turning the crank forward for one row, then manually moving the yarn to the other side and cranking in reverse for the return row. The panel will have a distinct front and back side.
Measure your gauge after knitting a few inches to ensure you’re on track. Place a ruler horizontally across the fabric and count the number of stitches per inch, then do the same vertically for rows. This gauge swatch will be your blueprint for every project that follows and is the key to consistent sizing.
Switching Between Circular and Flat Knitting
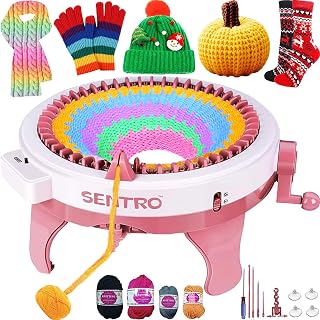
SENTRO 48 Needles Knitting Machine with Row Counter
Check PriceMany entry level circular machines, like the Sentro 48, are designed primarily for tubes, but you can still make flat pieces with a simple modification. By using the number of needles for the width you need and placing the rest in the non working position, you create a mini flat bed. Mark the end needles with colorful stitch markers to avoid accidentally engaging them.
When you want to switch back to circular knitting mid project, bring all needles back to the working position carefully. Inspect each needle’s latch to ensure it’s open before cranking, a closed latch will cause a skipped stitch. Transition rows sometimes look a bit loose, but a gentle tug on the fabric around the area usually tightens them up.
A helpful practice is to insert a lifeline, a contrasting waste yarn, through the live stitches before switching modes. If anything goes wrong, you can rip back to the lifeline without losing the entire piece. This technique has saved countless projects from disaster and is highly recommended when learning how to use a knitting machine for complex constructions.
Troubleshooting Common Knitting Machine Problems

SENTRO Upgraded Knitting Machine 48 Needles
Check PriceDropped stitches are the most frequent frustration for new machine knitters. A stitch drops when a needle fails to catch the yarn, leaving a ladder running down your fabric. Stop cranking immediately, use a latch hook to pick up the dropped loop, and ladder it back up through the rows above it.
If the yarn keeps snapping, your tension is set too tight or the yarn path is snagged on a rough edge. Inspect the entire route from the cone to the needle, especially the tension discs and the eyelet. Buff any tiny burrs with a fine emery board and try threading again with a lighter touch.
A machine that skips stitches intermittently may have dirty needles. Lint and residue from wool yarns build up quickly and prevent the latches from closing fully. Remove all needles one by one, clean them with a soft brush, and lightly lubricate the pivot points before reinstalling. This restores smooth, consistent stitch formation almost every time.
Maintaining Your Knitting Machine for Longevity

SENTRO 40 Needles All-in-One Knitting Loom
Check PriceRegular cleaning prevents most performance issues before they start. After each project, unthread the machine and use a soft, dry paintbrush to sweep away fiber dust from the needle bed and tension unit. Never use compressed air, it forces debris deeper into the mechanism and can damage delicate components.
Lubricate the moving parts sparingly according to the manual’s schedule. A single pinhead sized drop of high quality machine oil on the main gear and each needle track is sufficient. Over oiling will attract lint, creating a gummy sludge that’s harder to remove than the original dust.
Store your knitting machine under a dust cover in a low humidity environment. Needles can corrode if exposed to moisture, so include a silica gel packet inside the storage case. Many experienced users also keep a maintenance log, noting the date of each cleaning and any needle replacements, which helps identify patterns of wear over time.
Advanced Techniques, Patterns, Colorwork, and Shaping

addi Express Professional Knitting Machine
Check PriceOnce basic stockinette feels natural, explore fair isle designs by using a second yarn feeder. You’ll need to guide two separate strands through the tension mast, alternating which one enters the active needle path according to a chart. Keep floats short on the reverse side to avoid snagging during wear.
Shaping sleeves or garment pieces requires you to increase or decrease the number of working needles mid row. To decrease, manually remove a stitch from a needle and transfer it to the adjacent one with a transfer tool. To increase, you’ll cast on a new stitch onto an empty needle at the edge of your work.
Lace patterns are achievable by intentionally dropping and rehooking stitches into eyelet formations. This is advanced work that demands absolute concentration, but the results are stunning. Many resourceful makers adapt hand knitting stitch dictionaries to their machine by noting which needles to skip and which to manipulate. If you’re also curious about starting hand knitting, you can learn how to choose knitting needles for beginners before making the switch.
Comparing Different Types of Knitting Machines

PKHOUHYI Sentro 22 Needles Knitting Machine
Check PriceCircular knitting machines like the Sentro and Addi Express are ideal for hats, scarves, and quick tubes. They use a crank handle and are more portable, with fewer complicated parts. These machines typically have 22, 40, or 48 needles, and smaller needle counts create tighter tubes for socks or baby items.
Flat bed machines, including vintage Brother and Silver Reed models, offer punch card patterning and adjustable tension dials. They allow you to knit intricate colorwork and shaped garments with far greater control. However, they require more space, a dedicated table, and a steeper learning curve than circular machines.
The newest electric models, like the Caydo M1 Pro, combine motorized operation with app connectivity. They can automatically cycle through rows, count stitches, and even alert you to dropped stitches. This technology is making it easier than ever to learn how to use a knitting machine while still producing professional grade results. The Spruce Crafts provides an excellent overview of machine types and their capabilities.
Knitting Machine Projects for Beginners

SENTRO 40 Needles Circular Knitting Machine
Check PriceStart with a classic ribbed beanie. Using a 48 needle circular machine, cast on with 1×1 ribbing for the brim, then switch to full stockinette for the body. After about 25 total rounds, gather the live stitches onto a yarn needle and pull tight to close the crown, you’ve made a cozy hat in under an hour.
Cowls and infinity scarves are even simpler because they require no shaping. Decide on your desired width, knit a tube to the length you like, then graft the two ends together with a kitchener stitch. The resulting accessory looks hand knit but was created in a fraction of the time.
Once you’re comfortable, tackle a simple baby blanket by knitting multiple flat panels and seaming them. This teaches you how to control tension over larger pieces and gives you a functional, gift worthy item. Each project builds a critical skill, from casting off neatly to wet blocking your finished fabric for a professional drape.
Frequently Asked Questions

PKHOUHYI Sentro 40 Needles Knitting Machine
Check PriceCan I use any yarn with a knitting machine?
Not all yarns work well. Stick to smooth, plied yarns in the weight range recommended by your machine’s manufacturer. Highly textured, single ply, or eyelash yarns tend to split, jam, and break the stitches, causing constant frustration.
How do I fix a jammed carriage?
First, stop and cut the yarn. Remove the work from the needles if necessary, then manually rotate the handwheel backward to free trapped fibers. Never force the carriage forward, as this can bend needles permanently.
Is it hard to learn how to use a knitting machine?
The initial learning curve is moderate, but most people can produce a simple tube within their first hour. Consistent practice, starting with scrap yarn swatches, is the fastest route to confidence and skill.
Do I need special accessories to start?
A basic kit should include a claw weight, stitch markers, a latch hook, and a row counter. These few tools dramatically improve your results and are almost always included with mid range machines or available as affordable add ons.