Sewing patterns do not run small. Unlike ready-to-wear (RTW) sizes, patterns use body measurements and often include extra ease, resulting in a looser fit. A pattern size 14 may match a size 10 in RTW. Always select your pattern size based on measurements, not clothing labels, to ensure accurate fit.
The average woman in the UK wears a size 16 in ready-to-wear clothes, which typically measures around 41 inches in the bust, 33 inches in the waist, and 43 inches in the hips. However, that same size 16 on a sewing pattern envelope indicates measurements of 38 inches in the bust, 30 inches in the waist, and 40 inches in the hips. That’s a difference of at least 7 cm smaller!
How Sewing Pattern Sizes Differ from Ready-to-Wear
The frustration is real when sewing enthusiasts discover their ready-to-wear (RTW) size doesn’t match their pattern size. Many sewists are surprised to find themselves cutting out pattern sizes significantly larger than what they’d purchase in stores. This isn’t just a coincidence—there’s a historical explanation for why sewing patterns seemingly “run small.”
Why your usual size doesn’t work with patterns
Standard dress sizes originated in the 1950s, yet while RTW sizing has evolved dramatically over decades, pattern sizing has remained largely unchanged. Consequently, when you select a size 16 pattern, you’re essentially choosing a 1950s size 16, not a modern one! During that era, people were generally slimmer and shorter due to different lifestyles and even food rationing.
Furthermore, what many call “vanity sizing” has gradually increased RTW measurements. Though some view this as catering to consumers’ egos, it primarily reflects changing body shapes and the increasing average size of modern women. Meanwhile, pattern companies have maintained their original measurement standards, creating a growing disconnect between the two sizing systems.
Pattern companies have good reason for not updating their sizing standards. Despite seeming outdated, pattern sizing offers something RTW often doesn’t: consistency. Once you know your pattern size in one company’s designs, you’ll generally find it applies across their entire range. This stability allows sewists to confidently select patterns without constantly remeasuring.
Examples of size chart differences
To illustrate this disparity, let’s examine specific measurements. The UK’s average woman wears a size 16 in RTW clothing, which typically corresponds to:
| Measurement | Ready-to-Wear Size 16 | Pattern Size 16 | Difference |
|---|---|---|---|
| Bust | 41″ (104 cm) | 38″ (97 cm) | 3″ (7 cm) |
| Waist | 33″ (85 cm) | 30″ (76 cm) | 3″ (9 cm) |
| Hips | 43″ (108 cm) | 40″ (101 cm) | 3″ (7 cm) |
As shown above, pattern measurements are consistently smaller across all dimensions. This explains why a woman who wears RTW size 10-14 might need to select a pattern size 18 or even 20.
Some newer, independent pattern companies have started aligning their sizing more closely with modern RTW measurements, yet the major established companies (often called the “Big 4”) generally maintain traditional sizing standards.
Sewing pattern size chart
Understanding how to read and use a sewing pattern size chart is essential for successful garment creation. Unlike RTW shopping where you select a standardized size, sewing requires a different approach. To select your pattern size correctly, you must use your body measurements, not your ready-to-wear size.
Pattern envelopes typically provide two crucial sets of information:
- Body measurements chart – indicating which size corresponds to specific body dimensions
- Finished garment measurements – showing the actual dimensions of the completed item
The difference between these two measurement sets reveals the amount of “ease” built into the design, a concept we’ll explore further in the next section.
Most modern patterns are multi-sized, allowing you to blend between sizes when your measurements span different size ranges. For instance, if your bust measurement corresponds to size 14 but your hips to size 16, you can grade between these sizes for a customized fit.
For tops and dresses, select your size based on your bust or high bust measurement. For bottoms, use your waist or hip measurement depending on the garment style. Additionally, many pattern companies now offer multiple cup size options, which can significantly reduce the need for bust adjustments.
To avoid sizing frustration, remember this golden rule: ignore the size number entirely. As one experienced sewist notes, “Don’t get too hung up on the overall sizing number (it really is just an arbitrary number)”. Instead, focus on matching your actual body measurements to the pattern’s size chart.
The Role of Ease in Pattern Fit
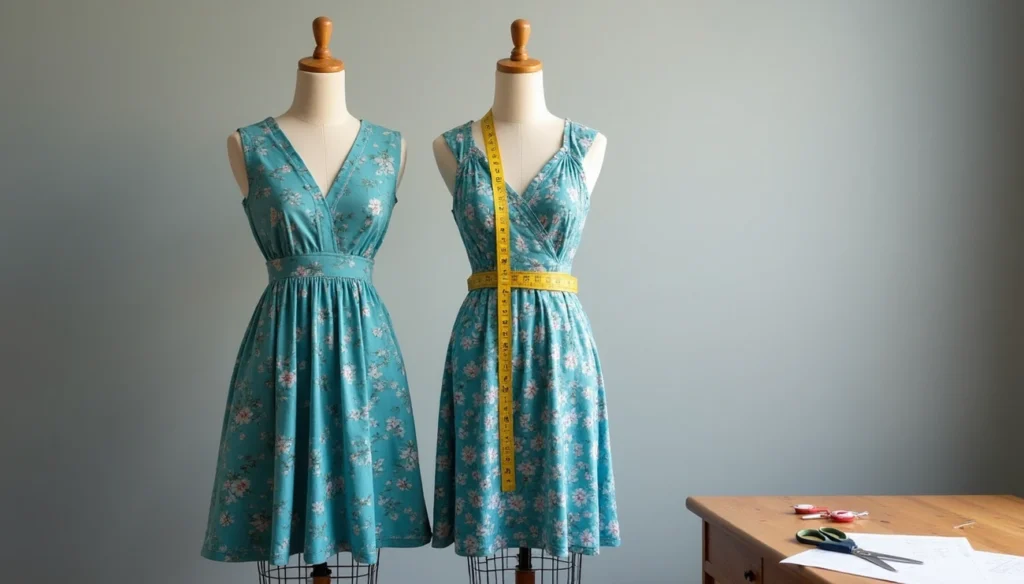
Understanding ease is fundamental to solving the pattern sizing puzzle. Ease represents the critical difference between your body measurements and the finished garment measurements—it’s what makes clothes wearable rather than skin-tight prisons.
What is ease in sewing?
Ease is the extra room built into a garment beyond your actual body measurements. Without adequate ease, you couldn’t sit, bend, or even breathe comfortably in your clothes. Primarily, ease serves two purposes: allowing movement and creating the intended style of a garment.
To calculate ease, simply subtract your body measurements from the finished garment measurements. For example, if your bust measures 37 inches and the finished garment measures 40 inches, you have 3 inches of ease. This seemingly small difference makes an enormous impact on both comfort and appearance.
The amount of ease varies across different parts of the body, reflecting our need for movement. Typically, standard wearing ease includes 2-2.5 inches at the bust, 1 inch at the waist, and 2-3 inches at the hips. These measurements aren’t arbitrary—they reflect the minimum space needed for basic activities in woven fabrics.
Fit ease vs. design ease
There are two distinct types of ease that affect your garment’s final fit and feel.
Wearing ease (sometimes called fitting ease) is the minimum amount of room needed for basic comfort and movement. It allows you to raise your arms, sit down, and breathe without straining seams. This is non-negotiable in woven fabrics, which lack stretch.
Design ease goes beyond basic functional requirements to create a particular silhouette or style. This esthetic choice varies dramatically depending on fashion trends and designer preference. A loose-fitting garment might have 12-20 inches of design ease at the bust, whereas a fitted garment might have just 3-4 inches.
The combination of these two types produces the total ease found in your pattern:
| Fit Type | Bust Ease | Hip Ease | Typical Garment Examples |
|---|---|---|---|
| Close-fitting | 2-2.5″ | Up to 2″ | Fitted bodice, pencil skirt |
| Fitted | 3-4″ | 2-3″ | Tailored blouse, straight skirt |
| Semi-fitted | 4-5″ | 3-4″ | Classic button-down, A-line skirt |
| Loose-fitting | 5-8″ | 4-6″ | Relaxed tunic, gathered skirt |
| Very loose | 8″+ | 6″+ | Oversized sweater, full circle skirt |
How ease affects final garment size
The amount of ease directly determines how the finished garment fits and functions. Each garment type requires different ease allowances—a coat needs significantly more ease than a dress, as it must fit over other clothes.
Coupled with this, the fabric type dramatically influences ease requirements. Woven fabrics with no stretch need more ease, whereas knit fabrics can have less or even negative ease. Understanding this relationship helps explain why sizing feels inconsistent across different pattern types.
When selecting patterns, focusing on the finished garment measurements rather than the pattern size is crucial. Regardless of what size number appears on the envelope, these measurements tell the true story of how the garment will fit.
Why ease makes patterns feel smaller or larger
Now we reach the heart of our question about patterns “running small.” In reality, patterns don’t necessarily run small—they simply include different amounts of ease than ready-to-wear clothing.
Pattern companies draft their designs with specific, consistent ease amounts, whereas ready-to-wear brands often add extra unspecified ease. This explains why you might wear a size 12 in store-bought clothes but need a size 16 pattern—the finished measurements could be identical despite the different size labels.
Additionally, design trends influence our perception of fit. As oversized styles have become fashionable in ready-to-wear clothing, we’ve grown accustomed to more ease than traditional sewing patterns provide. What feels “true to size” is ultimately subjective and constantly evolving with fashion.
How to Choose the Right Pattern Size
Selecting the correct pattern size requires a different approach than shopping for ready-to-wear clothing. Getting this crucial first step right saves time, fabric, and frustration throughout your sewing journey.
Measure your body, not your clothes
Taking accurate body measurements forms the foundation of successful sewing. Initially, many sewists make the mistake of selecting pattern sizes based on their ready-to-wear clothing size or by measuring existing garments. This approach often leads to poor-fitting results since pattern companies use different sizing standards.
For accurate measurements:
- Wear the undergarments you’ll wear with the finished garment
- Stand naturally without holding your breath
- Keep the measuring tape parallel to the floor
- Measure in the morning before your body changes throughout the day
“One of the best things about sewing is that you can create clothes that fit your unique body shape”. This customization begins with honest measurements taken directly from your body.
Using bust, waist, and hip measurements
Your body measurements determine which pattern size to select. Most patterns require three primary measurements:
- Bust: Measure around the fullest part of your chest
- Waist: Find the narrowest part of your torso (usually above your belly button)
- Hip: Measure around the fullest part of your hips/bottom
For tops and dresses, select pattern size based on your bust or high bust measurement. The high bust measurement (taken above your bust and under your armpits) is particularly helpful if you’re larger than a B cup, as most patterns are drafted for B cups.
For bottoms, choose your size based on your hip measurement if making pants or skirts. Given that “it’s very rare that we fit perfectly into the size chart of any one brand”, don’t be concerned if your measurements span multiple sizes.
How to read finished garment measurements
Beyond body measurements, understanding finished garment measurements proves invaluable. These measurements tell you the actual size of the completed garment, including ease.
Finished measurements can be found:
- On the pattern envelope back
- Within the instruction booklet
- Printed directly on pattern pieces (often marked with circles or lines)
To determine ease, subtract your body measurement from the finished garment measurement. For instance, if your bust measures 36″ and the finished garment measures 40″, you have 4″ of ease – indicating a semi-fitted garment.
Tips for combining sizes across body parts
Fortunately, most modern patterns are multi-sized, allowing you to “grade” between sizes for a customized fit. If your measurements span different sizes – perhaps a size 12 bust with size 16 hips – you can blend between these sizes by drawing smooth, curved lines connecting the different size lines.
When combining sizes:
- Ensure seams that join together match in size (e.g., bodice waist to skirt waist)
- Make the same adjustments on both front and back pattern pieces
- Modify facings to match your adjusted pieces
- Consider length adjustments separately from width adjustments
Remember, “the pattern sizes are just a starting point”. Your body’s proportions are unique, and customizing pattern sizes is a fundamental skill worth developing.
Common Fit Issues and How to Fix Them
Most sewists quickly discover that their bodies rarely match perfectly with standard pattern sizes. Addressing this reality requires understanding both why patterns seem to run small and how to adjust them for your unique proportions.
When your bust, waist, and hips are different sizes
Virtually no one has measurements that fall neatly into a single size. Bodies come in various shapes—hourglass, ruler, apple, pear, and triangle—each requiring different pattern adjustments. For instance, an hourglass figure typically needs a smaller waist size, whereas a pear shape needs a larger hip size. Understanding your body shape helps identify which adjustments will most improve fit.
Common body shapes and their typical adjustments:
- Hourglass: Grade waist smaller
- Ruler: Grade waist larger, hip smaller
- Apple: Grade waist larger or make full tummy adjustment
- Pear: Grade hip larger
- Triangle: Grade hip smaller
Adjusting patterns before cutting
Making adjustments to patterns before cutting your fabric saves time, materials, and frustration. Accordingly, most experienced sewists recommend working from the shoulders down when making multiple adjustments. This approach works because changes made to upper portions often affect how lower parts fit.
The one exception to this top-down rule? Full bust adjustments should be completed first as they “can dramatically impact the overall fit of the garment”. Subsequently, tackle other issues one at a time rather than attempting to fix everything simultaneously. This methodical approach prevents overwhelm—remember that “a garment to fit perfectly when you’re standing at your mirror may mean that you don’t have room to move around in it”.
Using muslins to test fit
A muslin (also called a toile) serves as a fitting laboratory where you can identify and solve fit problems before cutting expensive fabric. When making a test garment, use fabric with similar properties to your final fabric since “the type of fabric you choose can make a big difference on fit”.
Once wearing your muslin, look for:
- Undesired tightness or excess fabric
- Drag lines (tension lines pointing to problem areas)
- Inadequate length or uneven hems
- Gaping or pulling at seams
Taking photos from different angles or having someone else observe helps spot issues you might miss in the mirror.
Grading between sizes
Grading between sizes involves creating a smooth transition between different size lines on your pattern. This technique works well when measurements span up to three sizes, though “more than that is doable but just be careful about the curves you create”.
The process is straightforward: trace the relevant sizes, then draw a gentle line connecting them at transition points like bust, waist, and hip. Undoubtedly, the most important consideration is ensuring all pieces that join together (like bodice to skirt waistlines) match after grading.
For more complex fit challenges—like narrow shoulders with a full bust—specific adjustments often work better than simple grading. As one expert notes, “a narrow or broad shoulder adjustment is usually more effective than blending between sizes”.
Conclusion
Understanding why sewing patterns run small reveals the fascinating disconnect between modern ready-to-wear sizing and traditional pattern measurements. Pattern companies generally maintain their 1950s-era sizing standards while clothing stores have embraced vanity sizing, thus creating the illusion that patterns run small. Therefore, the key to successful sewing lies not in the size number but rather in working with your actual body measurements.
Your body measurements serve as the foundation for selecting pattern sizes. After that, understanding ease becomes essential—both the functional wearing ease needed for movement and the design ease that creates a particular silhouette. This knowledge explains why your pattern size often differs significantly from your store-bought size.